Chapter 18 Make a Distill site
18.1 tl;dr
This tl;dr is for readers who are already experienced with GitHub and want to see our “cheatsheet” version of the rest of this chapter. If you are looking for screenshots plus some hand-holding, we think you’ll benefit from reading the rest of this chapter.
Here’s how you make an Distill site from scratch, using a built-in site skeleton as a template:
Start with an empty RStudio project linked to a remote GitHub repository that you can push/pull from your local copy in RStudio.
Make sure the Distill package is installed:
remotes::install_github("rstudio/distill")In your project, create a simple shell for a Distill website by running the following code in your R console and entering a same for your site when prompted:
distill::create_website(dir = getwd(), gh_pages = TRUE)Build your site using the RStudio “Build” pane.
Push and commit to send your site online to GitHub- do you see your
.htmlfiles in the"docs"folder?Turn on GitHub Pages by going to your repository online. Click on the repository’s settings and under GitHub Pages, change the Source to be the
master branch /docsfolder. Note your new site’s URL!Edit your site, build it, then push and commit to GitHub to publish your changes online.
Rinse and repeat! Every push to your
masterbranch triggers the online version of your site to update.
18.2 Getting set up
18.2.1 Packages
The distill package needs to be installed from CRAN. You only need to do this once per computer.
install.packages("distill")18.2.2 Make a project
For your first Distill site, we recommend starting by creating a GitHub repository online first, then making a project in RStudio (if this is not your first rodeo, then you could checkout out the more advanced GitHub last workflow).
We recommend following the tips on Happy Git with R and starting in GitHub before switching to RStudio:
Create a new repository on GitHub for your work.
- Do not initialize the repo with a
.gitignoreor aREADMEfile (we’ll add these later!).
- Do not initialize the repo with a
Copy the repository URL to your clipboard.
Do this by clicking the green Clone or Download button.
Copy the HTTPS clone URL (looks like:
https://github.com/{yourname}/{yourrepo}.git).Or copy the SSH URL if you chose to set up SSH keys (looks like:
git@github.com:{yourname}/{yourrepo}.git).
Create a new RStudio Project via git clone. Open RStudio.
Do this by clicking File > New Project > Version Control> Git.
Paste the copied URL.
Be intentional about where you tell RStudio to create this new Project.
Click Create Project.
Follow these instructions from Happy Git with R to start with a new repo on GitLab or Bitbucket, instead of GitHub.
18.2.3 Make a Distill site skeleton
We’ll start by creating the shell for a basic Distill website and publishing this site to GitHub Pages straight away. In your R console, type and run the following code, entering a same for your site when prompted:
distill::create_website(dir = getwd(), gh_pages = TRUE)
You will end up with these files in your project. The most critical files are the index.Rmd and the _site.yml, and we mention a little about them below.
.
├── .Rproj.user
├── .nojekyll
├── _site.yml
├── about.Rmd
├── docs
├── index.Rmd
└── mydistillsite.Rproj
Close RStudio and re-open your site by clicking on the project file (.Rproj).
When you re-open the project, you may notice the .Rproj file shows up in your Git pane, which means that the file has changed since your last commit. What happened? RStudio has detected that you have built a website, so a single line has been added to your .Rproj file:
BuildType: Website18.3 A mini-orientation
Our project directory now has four new important items. Open and take a peek at each file as we touch on the them below:
index.Rmd: This will be our site’s homepage. This file must be namedindex.Rmd, and it must at minimum havetitle:,description:, andsite: distill::distill_websitefields.about.Rmd: This will be an additional page on our site, and you can change the name of this file to be whatever you want. Additional pages, like this one, at a minimum need to have a non-emptytitle:, but they don’t require adescription:orsite:line._site.ymlis not a file that gets turned into a site page, but it is necessary for site setup. In general, the_site.ymlfile lets us set options that will affect all pages in our site, and it has the same function here as it does in a typical R Markdown site. A few things you’ll notice about this YAML, if you’re comparing it to an R Markdown site’s:name: "basic-course-distill" title: "Demo Website" description: | Demo Website output_dir: "docs" navbar: right: - text: "Home" href: index.html - text: "About" href: about.html output: distill::distill_articleThe output here has to be
distill::distill_article. It’s okay for this to be on the same line asoutput:or indented on the line beneath it.Weirdly, the
description:field in_site.ymlis non-functional (as far as we can tell). But we will use it to create a subtitle of sorts in other YAMLS of our other Distill pages.docs/folder: This is the output folder, where knitted versions of our.Rmds live once they’ve been processed to become.htmlfiles.
Nothing else to do here, just good info to know. We’ll be circling back to these files later.
18.4 Push to GitHub
Let’s get these website files pushed up to our remote repository on GitHub. Do the following from RStudio:
Click Git in the same RStudio pane that also contains the Environment tab.
Check the box(es) under the “Staged” column and click Commit.
Add a commit message like “initial commit” and then click Push.
18.5 Build your site

In the lifecycle of your Distill site, you’ll be doing lots of building. What does building the site do? This processes your .Rmds and creates the docs/ folder (if it doesn’t already exist), which houses .html versions of each of your .Rmd files. AND each of these pages now has a common navigation bar at the top that links your site together (this is thanks to our _site.yml file–but more on that later).
In RStudio, you can render your site locally (knit + preview all .Rmd files in one fell swoop) from the either the IDE or the R console.
From the R console, you can run:
rmarkdown::render_site()OR from the IDE, find the Build tab and select Build Website:
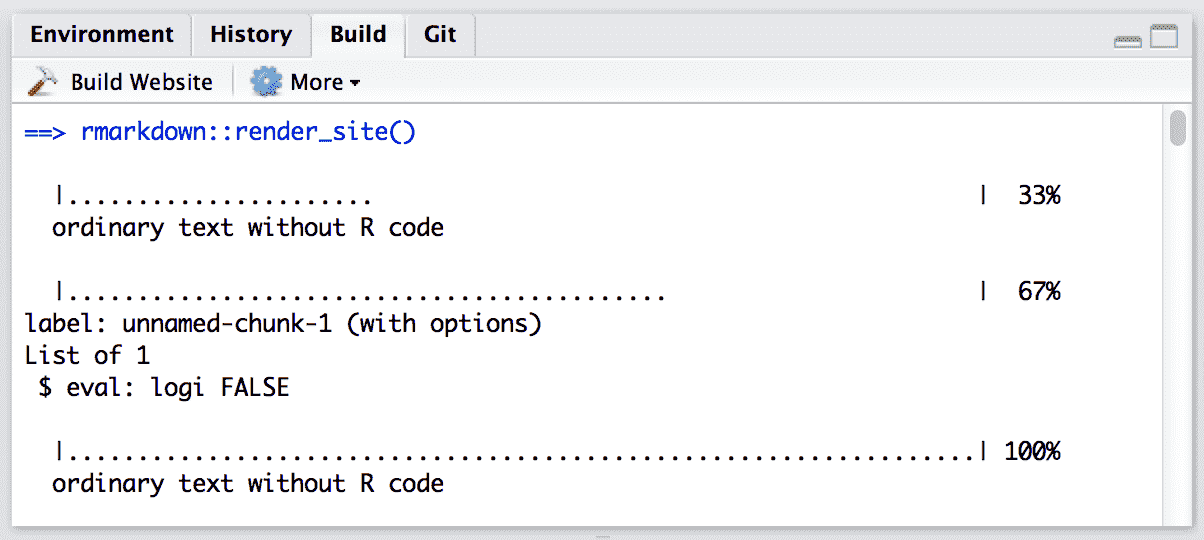
Figure 18.1: The build pane in RStudio
If the rendered site does not open up automatically in a new window, you can go to the docs/ folder in your project, click on the index.html file, and View it in Web Browser.
18.6 Push to GitHub (again)
Let’s get these new Distill website files pushed up to our remote repository on GitHub. If you want your site to have the most recent updates you’ve made, then every single .Rmd file with a change must be built right before pushing to GitHub. Using either the build pane or rmarkdown::render_site(), you don’t need to knit each .Rmd file one at a time, but you do need to build your site locally first every time.
Watch out! Each time you run rmarkdown::render_site(), the docs/ folder will be overwritten with updated HTML versions of your .Rmds. This means DON’T EVER EDIT FILES IN THE docs/ FOLDER! Nothing catastrophic will happen if you do, but you will overwrite and lose all your changes the next time you knit or render_site().
Go ahead and stage all your changed files, commit, and push to GitHub.
Now we’ll get to the good stuff! Let’s put this on the internet!
18.7 Make a living, breathing site!
We have built some out-of-the-box content and pushed to GitHub. Now we’ll go back to the GitHub website and tell it where to find our website-ready files:
Back on GitHub, click the Settings tab of your project repository.
Scroll down until you get to “GitHub Pages” and select “master branch/docs folder”. (This is why we had to set up
output_dir: docsin oursite.ymlfile previously. If your file doesn’t end up in thedocs/folder, GitHub pages won’t find it.)
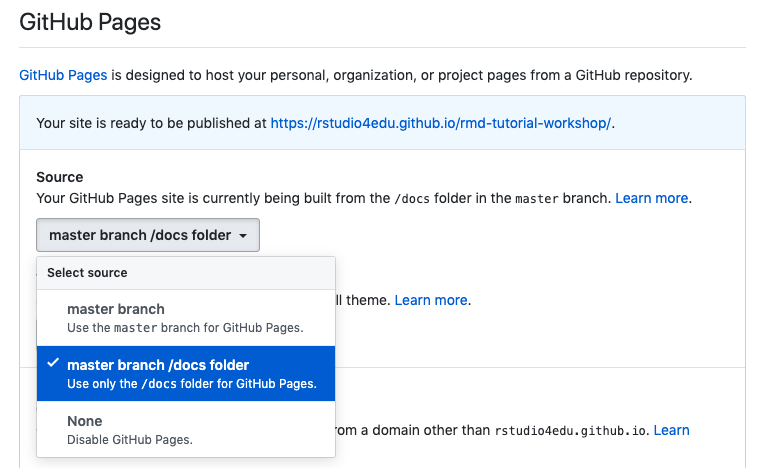
Congratulations! A url is generated–this is your website address. You can share it, tweet it, send it to your mom–it’s now live!
Add this url to the repo description so that it’s easy to find.

Now that the bare bones of the site are up, you can go back and add more content to your Distill documents anytime. Your changes will go live as soon as you build or render_site(), followed by a push to GitHub.
18.8 Uplevel your workflow
We followed a “GitHub first” workflow above, but if you’ll be using GitHub regularly, we recommend evolving this workflow.
First, install the usethis package:
install.packages("usethis")Then load it to use it:
library(usethis)
Now, follow the instructions from Happy Git with R for setting up a GitHub personal access token or PAT.
Be sure to restart your R session after setting up the PAT, and pay close attention that your .Renviron file has at least one empty line at the bottom.
Once you have a GitHub PAT set up in your .Renviron file, you can stay in the comfort of your project in the RStudio IDE to do all the GitHub things we were doing before online in your browser.
Now, here is your advanced workflow for creating a new Distill site inside a project:
Click File > New Project > New Directory
Scroll down and select Distill Website, and check the box to “Configure for GitHub Pages”
Then use your R console to run this code:
use_git()
use_github() # you have to have a PAT setup